How to Connect a Subwoofer to a Laptop?

So many new audiophiles have asked me if they can connect subwoofers with their PCs or laptops. That’s not rocket science. You just need to ensure some adjustments and use the right equipment for your sound system.
However, a subwoofer accentuates the bass notes, providing a rich, immersive sound that standard laptop speakers can’t match. In this guide, I will walk you through the step-by-step process of setting up a subwoofer with your laptop, even if you’re a beginner. Let’s begin!
Can You Connect a Subwoofer to Your Laptop?
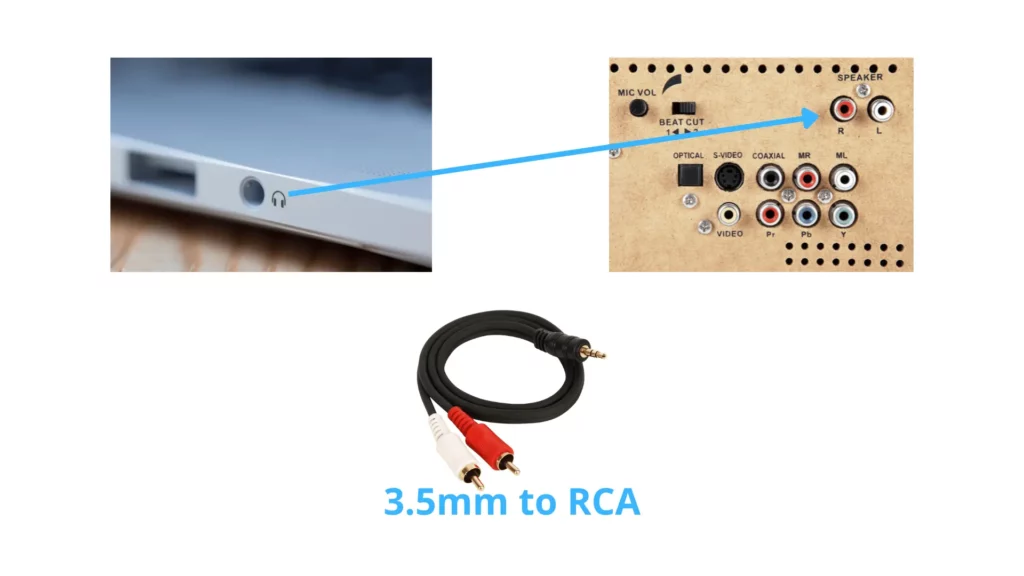
Yes, you can quickly connect an active subwoofer to your laptop without much effort. By using either a 3.5mm to 3.5mm audio cable (if your subwoofer supports it) or a 3.5mm to RCA cable, depending on what ports are available, you can facilitate a connection between these two devices. The cable plugs into your laptop’s audio output and the subwoofer’s input.
3 Methods to Connect a Subwoofer to Your PC or Laptop:
Here are my three methods that will help you connect the subwoofer to your PC or laptop:
Method #1 – 3.5mm Headphone Output to RCA Cable (Easy Peasy):

This is the easiest method. However, it will provide an unbalanced sound which means the sound will distort a bit at high volume if the cable is longer than 10 feet. Anyway, follow the below steps:
- Gather the Necessary Equipment: In this configuration, you just need a cable that has 3.5mm at one end, and RCA (left and right channels) plugs on the other end.
- Identify the 3.5mm Audio Output: Almost every PC and laptop has a headphone or audio output jack. You can quickly identify a small round port, often labeled with a headphone symbol.
- Connect the 3.5mm End: After locating, you should plug one end of the 3.5mm to RCA cable into the headphone output of your desktop.
- Connect the RCA Ends: Now, you can connect the cable’s red & white RCA connectors to the corresponding inputs on the subwoofer. Remember to follow the connectivity pattern (red goes to red, and white goes to white).
- Power on the Subwoofer: Now, simply put the power cord of the subwoofer to the wall output and turn ON the switch.
- Adjust Audio Settings (If Needed): Some subwoofer requires audio settings, such as crossover and HPF. You have to play with the settings and find the best one that suits your music taste.
Method #2 – Using an HDMI Connection (For Better Sound Quality):

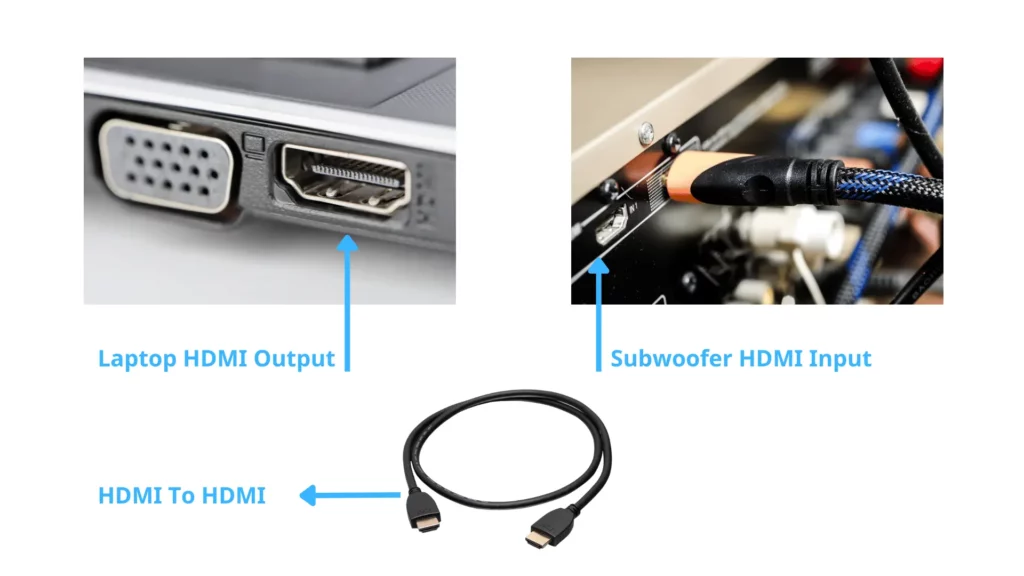
This method only applies to subwoofers with HDMI input on its system. However, this method is not primarily used as the HDMI port is only used for video and audio transmission between laptops and other screens. Anyway, if your subwoofer and laptop have this configuration, just follow the below steps:
- Check the Subwoofer and Laptop: Double-check that your subwoofer has an HDMI input and your computer has an HDMI output port that supports audio transmission.
- Get an HDMI Cable: You should get yourself an HDMI cable that supports the connectors types of both the laptop and sub.
- Connect the HDMI Cable: Now, simply put one end of your HDMI cable into the laptop’s HDMI output port while the other end is into the HDMI input of the subwoofer.
- Power ON the Subwoofer: It’s time to test the subwoofer if you have gained a successful connection between your laptop and subwoofer using HDMI. For this, you should turn on the subwoofer using its power source.
- Change Your Default Sound Settings on Laptop: Now, you should set the HDMI output as the default audio device on your Windows PC. Simply right-click the speaker icon on the taskbar, select “Playback devices,” and then right-click the HDMI output option (e.g., “NVIDIA HDMI Output” for NVIDIA users) and choose “Set as default device.”
- Adjust Audio Settings (If Needed): You can play with the HPF and crossover settings (available on your subwoofer’s back) to adjust the sound quality according to your needs.
Method #3 – Using an Audio Interface Device (For High-Quality Balanced Sound):
This is my recommended and favorite method to connect a subwoofer to the laptop or PC. The XLR or TRS will ensure a balanced sound from your subwoofer, even if the cable is beyond 30 feet. You can follow the steps below:
- Get an Audio Interface Device: You should get an audio interface device that has balanced audio outputs. Please don’t ignore the fact it should also have necessary input options for connecting your subwoofer.
- Connect the Audio Interface to Your Laptop: You can use the appropriate cable (usually USB or Thunderbolt) to join the audio interface to your computer.
- Connect the Subwoofer to the Audio Interface: Now, you should use the balanced audio cables (XLR or TRS) to connect the audio interface device to the balanced audio inputs of your subwoofer.
- Power on the Subwoofer and Audio Interface: Now, it’s time to turn on both the subwoofer and the audio interface.
- Adjust Audio Settings: Now, you should access your laptop’s audio settings and set the audio interface as the default output device.
- Calibrate the Subwoofer: You can also use the audio interface’s control software or physical controls to calibrate the subwoofer for optimal audio performance.
- Test the Setup: Play audio on your laptop and ensure the subwoofer produces balanced and high-quality sound.
Things to Consider Before Connecting a Subwoofer to Laptop:
Here are a few things that you should consider before beginning the process:
- Compatibility: You should not ignore the compatibility between your powered subwoofer and laptop. Ensure both devices have input/output options. Standard connections include 3.5mm audio jacks, RCA ports, and interfaces.
- Power Requirements: Before making a connection, you should ensure that the subwoofer has a required power source to avoid any damage. If not, you can use a separate power supply for this purpose.
- Audio Settings: You should verify that your laptop allows external audio devices to connect. Depending on your chosen method, you may need driver installations or even software configurations.
- Subwoofer Placement: You should find a suitable subwoofer spot for optimal sound quality. It shouldn’t be too much away from your sitting or not close to your sitting. However, placing it near walls or corners can enhance bass but avoid obstructing vents or speakers.
- Cable Length: Always consider the cable length needed to connect the subwoofer to the laptop without creating clutter or strain.
- Audio Quality: As mentioned above, consider using an audio interface device with balanced outputs for better audio performance if seeking high-quality sound.
General FAQs
Can I Connect a Wireless Subwoofer to My Laptop?
Yes, it is possible to connect a wireless subwoofer to your laptop. This can typically be achieved through Bluetooth or Wi-Fi connectivity. However, you should ensure your computer and subwoofer are compatible, and the subwoofer supports wireless connections before attempting to connect.
Are There Subwoofers Specifically Designed for Laptops?
Yes, there are subwoofers specifically designed for laptops. These compact, portable speakers are often USB-powered, making them perfect for enhancing audio performance on the go. They can significantly improve the depth and richness of your laptop’s sound output.
Can I Connect Multiple Subwoofers to My Laptop for More Bass?
Yes, you can connect multiple subwoofers to your laptop for more bass using a mixer or an audio interface with multiple outputs. However, be careful with the overall sound balance, as more subwoofers can overpower the mid and high frequencies.
